Dev Guide
Overview
The NE100-CM01 is a high-performance development board designed for the NeoEyes series NE101 Vision AI camera. Powered by the ESP32-S3 MCU, it features an ultra-low-power architecture and supports multiple event-triggered image capture modes. This board enables rapid prototyping and customization of IoT camera applications, making it ideal for use cases such as smart agriculture, environmental monitoring, security surveillance, and wildlife observation.

Key Features
- Ultra-Low Power:Based on the ESP32-S3,Supporting deep sleep mode and sensor-triggered wake for quick image capture.
- Flexible Camera Integration:
- Support the OV5640 camera module with 120° and 60° FOV options
- CSI or USB interface support
- Swappable lens modules for customizable focal lengths
- Diverse Connectivity Options:
- Built-in Wi-Fi
- Compatible Cat.1 LTE Module
- Compatible with Wi-Fi HaLow for long-range, low-power applications
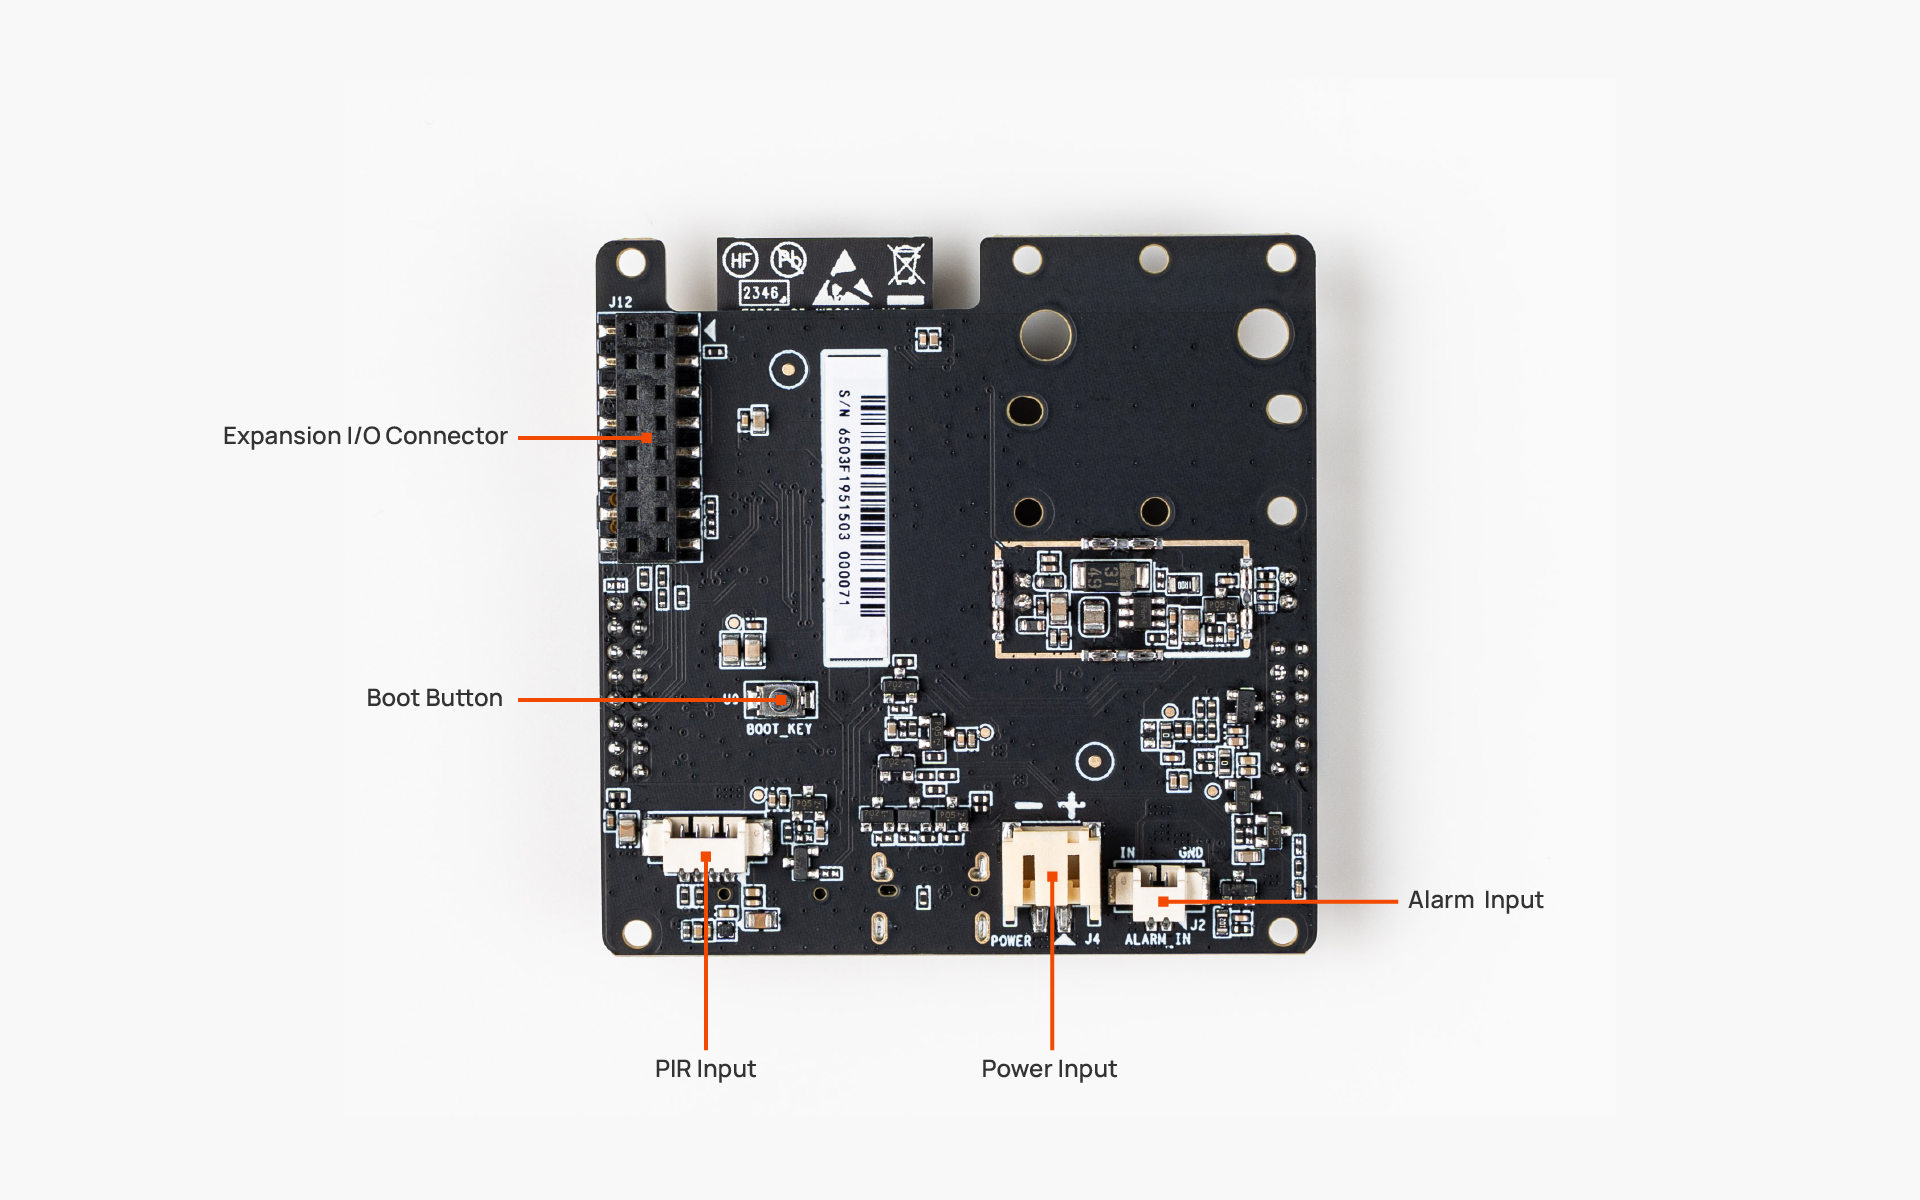
- Rich I/O Interfaces:
- 16-pin GPIO for expansion
- USB Type-C for power supply and debugging
- TF card slot for local storage
- Alarm input interface
- Modular Design:Offering interchangeable cameras, connectivity, and power modules.
- Open Hardware:Customized and expanded based on application requirements.
Specifications
| Model Name | NE100-MB01 |
|---|---|
| MCU | ESP32-S3 |
| RAM | 8MB |
| Flash | 16MB |
| Camera Module | OV5640 module (CSI), optional USB camera |
| FOV | 120°/60° (optional) |
| Focal Length | Near focus (8cm/15cm) or far focus (3m/4m) (optional) |
| Connectivity | Wi-Fi (standard),Cat.1 LTE/Wi-Fi Halow (optional) |
| Buletooth | Supported |
| Power Supply | USB-C(5V/1A) or 4×AA batteries(6V) |
| GPIO Expansion | 16-pin |
| Operation Temperature | -20°C to 60°C |
| Storage | Micro TF Card |
| LED | Supported |
| Dimension | 60 x 60 x 25mm (PCB only) |
Development Resources
he NE100-CM01 development board comes with comprehensive development resources and documentation. Below are links to the relevant materials:
Hardware Resources
- Hardware Overview - Detailed introduction of board components and specifications
- Hardware Connection Guide - Interface and connection instructions
Software Resources
- System Flashing & Initialization - Step-by-step firmware flashing instructions
- Development Environment - ESP-IDF environment configuration guidance
Application Examples
- PIR Sensor Example - Motion detection using a PIR sensor
- Low-Power Image Capture - Image capture in low-power scenarios
Quick Start
For new users, please refer to the Quick Start Guideo get up and running with the NE101 device. The guide will help you complete the initial setup and system configuration.
Development Process
-
Hardware Connection
- Connect power via USB-C or batter
- Connect optional sensors to GPIO pins
- Connect to a PC via USB
-
Software Development
- Install the ESP-IDF development environment
- Use provided sample projectsis as a starting point
- Compile and flash firmware
-
Testing and Debugging
- Monitor serial output (baud rate: 115200)
- Configure program through the web interface (http://192.168.1.1)
- Verify power consumption in sleep mode
-
Deployment
- Network settings
- Set up capture schedules
- Data transmission testing
References
- Official Espressif documentation
- Espressif IoT Development Framework
- Open-source firmware repository
For further technical support, please contact our technical support team.
For more product information, please refer to NE101 Series Product Overview。