System Flashing
This chapter aims to introduce the programming method for the NG4500 series products, focusing on providing specific operation steps for programming the image package. Taking the NG4511 device as an example, it details the programming process.
Preparation
-
An Ubuntu computer (recommended version: 20.04 or 22.04)
-
Jetson device (e.g., NG4511)
-
A Micro USB cable
PC (Ubuntu Computer) Environment Setup
Before programming, please ensure that the following software packages are installed in advance. You can install them using the following commands:
sudo apt update
sudo apt install -y build-essential git wget curl python3 python3-pip \
  python3-venv python3-distutils python3-setuptools python3-pexpect \
  python3-serial libusb-1.0-0-dev pkg-config device-tree-compiler \
  unzip bzip2 zstd
Hardware preparation
Before performing software flashing, please complete the following hardware connections and settings:
-
Use a Micro USB data cable to connect the Micro USB port of the Jetson device to the USB Type-A port of the Ubuntu host computer.
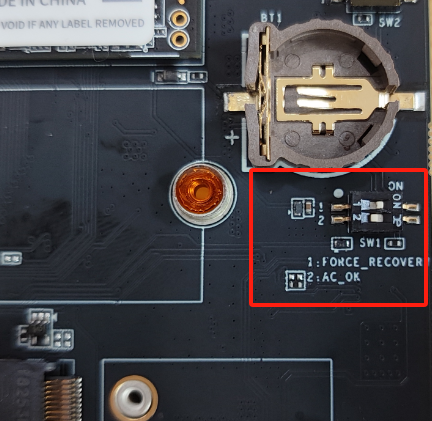
-
After the connection is complete, switch the first bit of the device’s
SW1DIP switch toONto put the device into Recovery mode.
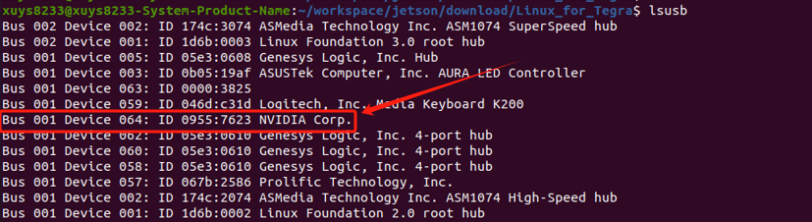
- If the device has entered Recovery mode, the command output will show an NVIDIA Corp device with ID 0955:7623.
Note: If the NVIDIA Corp device does not appear, it indicates that Recovery mode was not properly entered. Please check the Recovery mode switch settings and the USB cable.
Method for Flashing Image Package
Please follow the steps below to download and extract the AIBOX flashing package:
- Download the AIBOX flashing package from the link below:
- After downloading, unzip the flashing package
sudo tar -zxvf aibox-NG4511-36.4.3-base-jetpack-V1.0.tgz -C ./
- After unzipping, switch to the flashing directory and run the following command to start flashing
cd aibox-NG4511-36.4.3-base-jetpack-V1.0
sudo ./tools/kernel_flash/l4t_initrd_flash.sh --network usb0 --flash-only --showlogs
- After the flashing process is completed, the log will show
Flash is successful, which means the flashing is successful. Turn SW1 dial 1 to off and restart.
Note: Methods to Confirm Device Hardware Version
A. When System is Booted and Accessible
- Retrieve device model information using the following command:
cat /proc/device-tree/model

# Example output:
NVIDIA Jetson Orin Nano Engineering Reference Developer Kit Super
B. When System is Not Booted/Inaccessible
-
Verify model via device label or packaging box
-
Inspect the 15-digit combination below the QR code on the back of the module (e.g., 900-13767-0030-000). Refer to the decoding table below:
3767→ Orin related equipment(如 AGX Orin、Orin NX、Orin Nano)0030→ Jetson Nano(8GB RAM)
| SKU | Equipment Type | Equipment Name |
|---|---|---|
| 3767 | NVIDIA Jetson Orin NX和Nano Module | Jetson Orin NX和Nano Module |
| 3701 | NVIDIA Jetson AGX Orin Module | Jetson AGX Orin Module |
| 3768 | Jetson Orin Nano Carrier board | Jetson Orin Nano Carrier Board |
| 3737 | Jetson AGX Orin Carrier Board | Jetson AGX Orin Carrier Board Carrier Board Carrier Board Carrier Board |
| 0000 | Jetson AGX Orin Module | Jetson AGX Orin |
| 0004 | Jetson AGX Orin Module | Jetson AGX Orin 32GB (32 GB RAM) |
| 0005 | Jetson AGX Orin Module | Jetson AGX Orin 64GB (64 GB RAM) |
| 0000 | Jetson Orin NX and Nano Module | Jetson Orin NX 16GB (16 GB RAM) |
| 0001 | Jetson Orin NX and Nano Module | Jetson Orin NX 8GB (8 GB RAM) |
| 0003 | Jetson Orin NX and Nano Module | Jetson Orin Nano 8GB (8 GB RAM) |
| 0005 | Jetson Orin NX and Nano Module | Jetson Orin Nano 8GB (8 GB RAM) |
| 0004 | Jetson Orin NX and Nano Module | Jetson Orin Nano 4GB (4 GB RAM) |
NVIDIA Official programming method
-
SDK Manager programming,refer to:Install Ethernet Switch with SDK Manager — SDK Manager
-
To Flash the Jetson Developer Kit Operating Software,refer to:Quick Start — NVIDIA Jetson Linux Developer Guide 1 documentation